What is a pop-up drain assembly?
A pop-up drain assembly is the mechanical system inside your bathroom sink that lets you hold water in the basin or release it down the drain. When you pull the lift rod behind your faucet, a series of connected parts work together to seal the drain opening. Push the rod down, and the stopper lifts to let water flow.
This mechanism has been the standard in bathroom sinks for decades. It is simple, reliable, and universal across nearly every faucet brand. But the quality of the components matters enormously. A cheap plastic assembly from a big-box store might work for a year or two before the threads strip, the pivot nut cracks, or the stopper seal degrades. A brass assembly built to OEM spec can last 15 to 25 years.
FourHome cast brass lavatory pop-up assembly, 1-1/4" universal fit
That difference in lifespan is why property managers, plumbers, and serious DIYers are increasingly looking for brass construction when they need a replacement drain assembly, not the plastic unit that came bundled with a budget faucet.
Every part explained (with diagram)
A standard bathroom sink pop-up drain assembly contains 15 individual components. Understanding each one helps you diagnose problems, order the right replacement, and install it correctly the first time.
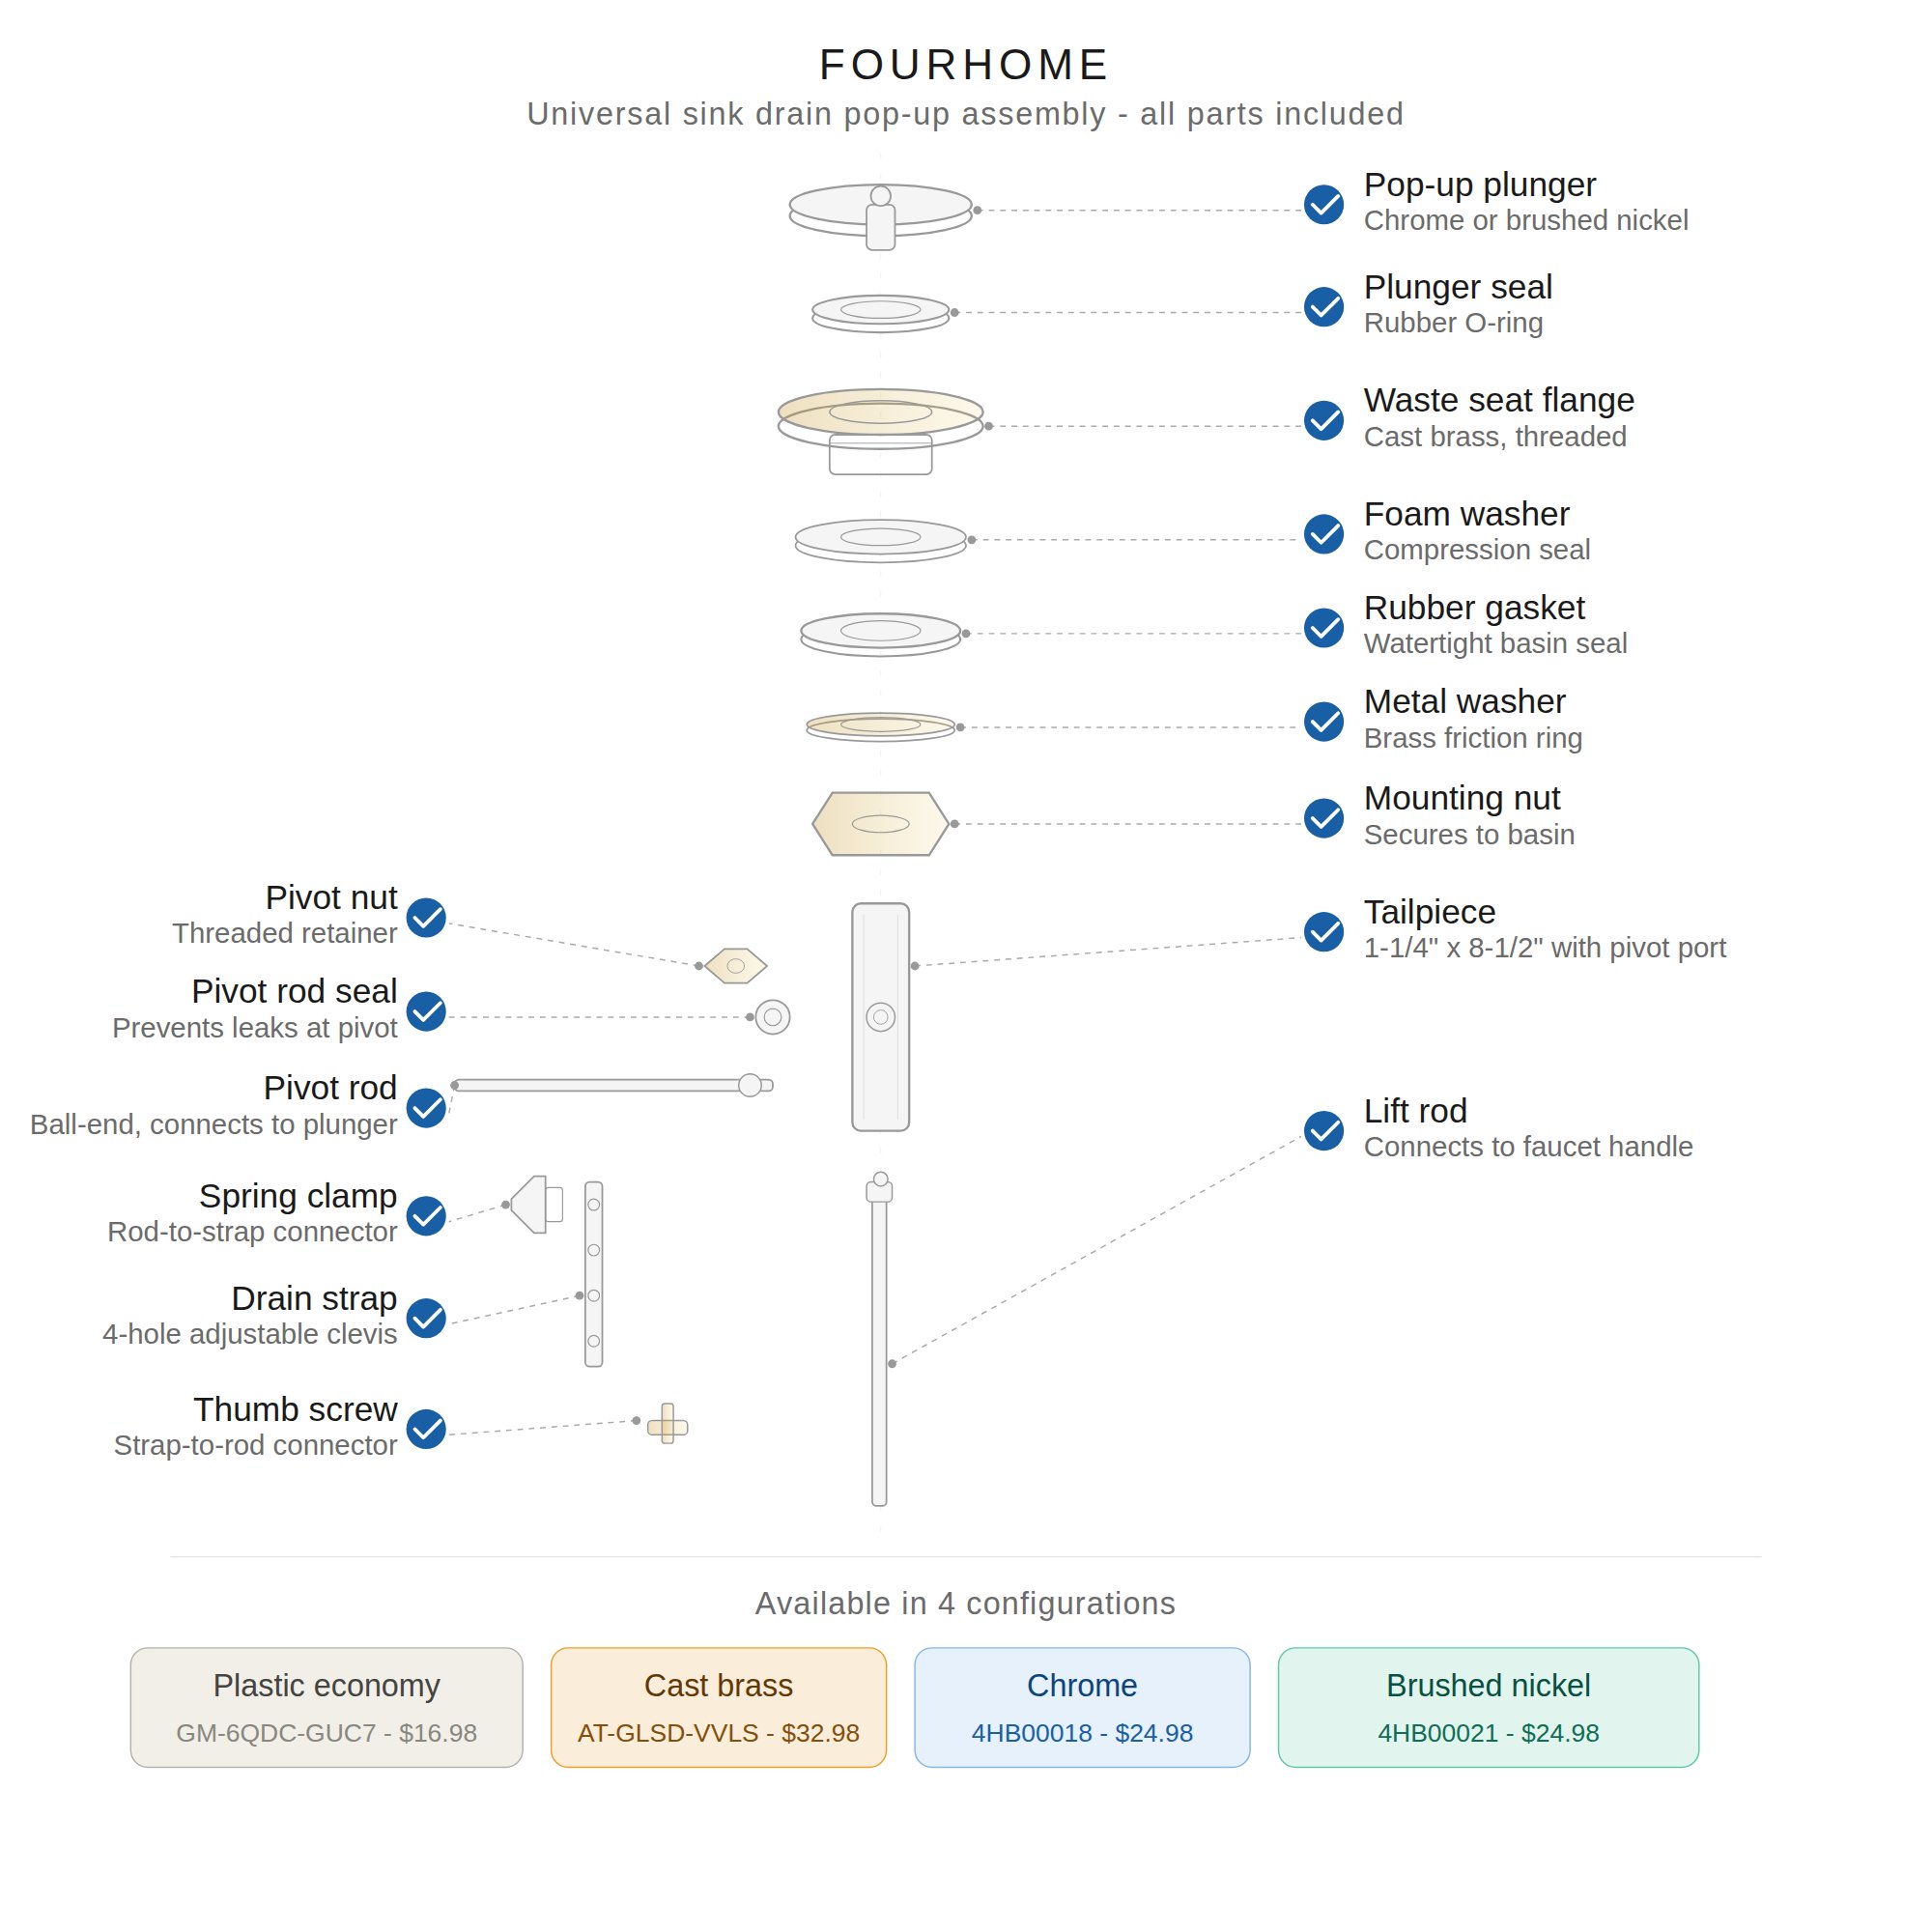
All 15 components of a FourHome universal pop-up drain assembly
Pop-up plunger (stopper): The visible cap that sits inside the drain opening. Available in chrome or brushed nickel to match your faucet finish. This is the part that creates the watertight seal when closed.
Plunger seal: A rubber O-ring gasket on the underside of the stopper. This is the actual sealing surface. When it wears out, your sink will not hold water even when the stopper is down.
Waste seat flange: The threaded body that sits inside the drain hole. In quality assemblies, this is cast brass. It is the structural backbone of the entire assembly.
Foam washer and rubber gasket: Compression seals between the sink basin and the mounting hardware underneath. The foam washer compresses to fill gaps. The rubber gasket creates the primary watertight barrier against the underside of the sink.
Metal washer: A brass friction ring that distributes pressure evenly from the mounting nut, preventing the gasket from deforming under uneven tightening.
Mounting nut: The hex nut that clamps the entire assembly to the sink basin from below. Tighten firmly but do not over-torque. You can crack porcelain or strip threads.
Tailpiece: The vertical tube (typically 1-1/4" x 8-1/2") that extends downward from the drain body and connects to your P-trap. Includes the pivot port on the side where the pivot rod enters.
Pivot rod and pivot rod seal: The horizontal arm that enters the tailpiece through the pivot port. A ball on the rod tip engages a slot in the bottom of the stopper. The seal (rubber gasket around the ball) keeps water from leaking out of the pivot port.
Pivot nut: A threaded retainer cap that compresses the pivot rod seal against the tailpiece. This is the single most common leak point on any pop-up assembly. Tighten enough to seal, loose enough that the rod still pivots freely.
Clevis strap: A flat metal strip with 4 adjustable holes connecting the horizontal pivot rod to the vertical lift rod. Moving the connection point up or down changes how high the stopper lifts and how firmly it seals.
Spring clamp and thumb screw: Fasteners securing the pivot rod to the clevis strap and the strap to the lift rod.
Lift rod: The vertical rod extending up through the faucet body. This is what you grab behind the spout to open and close the drain.
When removing an old pop-up assembly, save the clevis strap and spring clamp. These are universal across most assemblies and serve as backup parts for future repairs.
Brass vs plastic: which material lasts longer?
This is the most important decision when buying a replacement drain assembly. Almost every faucet sold at big-box retailers ships with a plastic pop-up assembly. It works on day one. Here is what happens over time:
| Feature | Cast brass | Plastic (ABS/PVC) |
|---|---|---|
| Typical lifespan | 15-25 years | 3-7 years |
| Thread durability | Holds threads under torque | Strips with moderate force |
| Corrosion resistance | Excellent with plating | Does not corrode |
| Heat tolerance | High (hot water safe) | Moderate (can warp) |
| Seal integrity over time | Maintains compression | Loosens, needs retightening |
| Cost per unit | $25-35 | $12-18 |
| Cost per year of service | ~$1.50/year | ~$3.00/year |
| Professional preference | Preferred by plumbers | Often replaced on first call |
The math is clear. Brass costs more upfront but saves money over time because you are not replacing it every few years. Professional plumbers overwhelmingly prefer brass assemblies. In commercial and multifamily settings, where maintenance labor is the biggest cost driver, brass is the standard specification.

Finished brass cartridge and drain components at the Bassco manufacturing facility
The most common failure point on plastic assemblies is the pivot nut. Under repeated use, plastic threads compress and lose grip. The nut loosens, the pivot rod seal fails, and water drips from the pivot port every time the sink drains. On a brass assembly, the threads maintain their integrity for the life of the product.
If you manage 50+ units, switching to brass pop-up assemblies can eliminate most bathroom sink maintenance calls related to drain leaks. The upfront cost difference is roughly $12-15 per unit. The labor savings from avoiding repeat service visits pays for itself within one quarter. FourHome offers volume pricing on Amazon Business for orders of 5+ units.
How to choose the right replacement
Before you buy, confirm three things about your existing sink:
1. Drain opening size
Bathroom sink drain openings are almost universally 1-1/4" in diameter. This is the US standard and has been for decades. Kitchen sinks use a larger 3-1/2" opening, which is a completely different product. If your bathroom sink has a standard round drain hole, a universal 1-1/4" assembly will fit.
2. Overflow or no overflow
Look inside your sink basin near the top rim. If there is a small hole leading to the back of the drain (usually covered by a chrome ring), your sink has an overflow. Most standard bathroom vanity sinks have overflows. Vessel sinks and some modern designs do not. Pop-up assemblies with lift rod mechanisms are designed for sinks with overflows.
3. Finish
Match the finish of the visible stopper and flange to your faucet. Chrome is the most common and pairs with polished chrome faucets. Brushed nickel works with satin, brushed, or stainless finishes. The parts below the sink are hidden, so finish does not matter there.
Step-by-step installation (15 minutes)
Total time: 15-20 minutes. No specialty tools required. You will need channel-type pliers, plumber's putty (or the gasket included in your kit), a small bucket, and a flashlight.
Turn off water and clear the vanity
Close the shut-off valves under the sink. Remove everything from the vanity cabinet so you have room to work. Place a bucket under the P-trap to catch residual water.
Remove the P-trap
Loosen the slip-joint nuts by hand or with pliers. Carefully remove the P-trap and pour out any water. Set it aside.
Disconnect the old linkage
Squeeze the spring clip to detach the pivot rod from the clevis strap. Pull the lift rod up and out through the faucet. Unscrew the pivot nut from the tailpiece and remove the pivot rod.
Remove the old drain assembly
Use pliers to loosen the mounting nut from below the sink. Push the old flange up through the sink from below. Pull it out from the top. Clean off any old putty or sealant from around the drain hole.
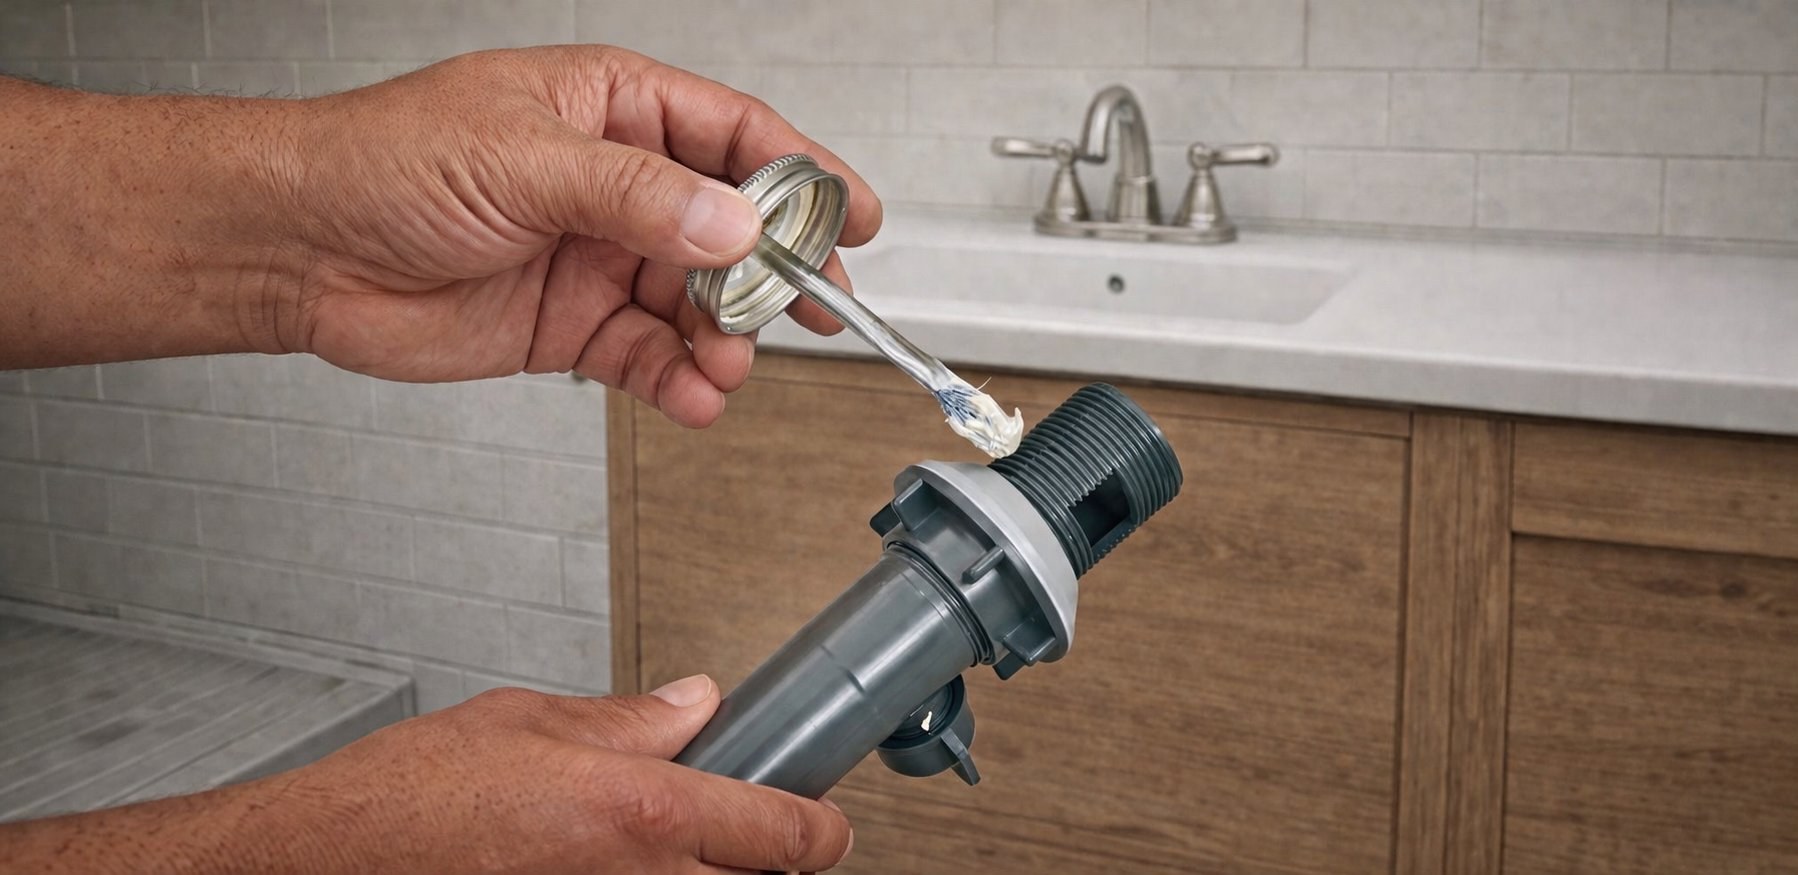
Apply sealant and set the new flange
Roll plumber's putty into a thin rope and press it around the underside of the new drain flange. Or use the rubber gasket included in your kit. Insert the flange into the drain hole from above and press firmly.
Secure from below
From under the sink, slide the foam washer, rubber gasket, metal washer, and mounting nut onto the tailpiece in that order. Hand-tighten the mounting nut, then snug it with pliers. Make sure the pivot port faces the back of the sink. Wipe excess putty from around the flange.
Install the stopper and pivot rod
Drop the stopper into the drain from above with the pivot hole facing the back. Insert the pivot rod through the pivot port so the ball tip engages the slot in the stopper. Thread the pivot nut on and tighten until snug but the rod still moves freely.
Connect the linkage
Feed the lift rod down through the faucet. Attach the clevis strap to the lift rod with the thumb screw. Connect the pivot rod to the strap with the spring clip. Test the mechanism. The stopper should lift and seal smoothly. Adjust the clevis hole position if needed.
Reconnect the P-trap and test
Reattach the P-trap. Turn on the water. Fill the sink and check for leaks at the flange, the mounting nut, and the pivot nut. Drain the water and verify no drips under the sink. Done.
5 common problems and how to fix them
1. Sink will not hold water
The stopper seal is worn or the stopper is not dropping low enough. Check the rubber seal on the underside of the stopper. If it is cracked or compressed flat, replace the stopper. If the seal looks fine, adjust the clevis by moving the pivot rod up one hole on the strap. This increases downward travel and creates a tighter seal.
2. Water leaks from the pivot nut area
This is the most common pop-up drain issue. The pivot nut is not tight enough, or the internal gasket around the ball has degraded. Tighten the pivot nut a quarter-turn at a time until the leak stops but the rod still moves. If tightening does not work, remove the nut, inspect the ball gasket, and replace it if worn. Apply plumber's grease to the ball before reassembling.
3. Stopper moves slowly or feels stiff
Hair, soap scum, and mineral buildup around the pivot rod and stopper are restricting movement. Remove the stopper and pivot rod, clean everything with a brush and mild detergent, apply plumber's grease to the ball, and reassemble.
4. Lift rod has no effect on the stopper
The linkage is disconnected. Look under the sink. The spring clip may have slipped off, or the clevis screw may have loosened. Reconnect the pivot rod to the clevis strap and tighten all connections.
5. Water leaks around the drain flange into the vanity
The seal between the flange and the sink surface has failed. This happens when plumber's putty dries out after years, or if the mounting nut has loosened. Remove the flange, clean the surface, apply fresh putty or silicone, and reinstall. Tighten the mounting nut firmly from below.
If your pop-up assembly is less than 5 years old and only one component is failing, repair it. If it is more than 10 years old, or if the tailpiece body shows corrosion or cracking, replace the entire assembly. A full replacement takes 15 minutes and ensures every seal and gasket is fresh.
FourHome pop-up drain assemblies
FourHome manufactures universal sink pop-up drain assemblies in four configurations. All fit standard 1-1/4" drain openings, include every part shown in the diagram above, and ship with Amazon Prime 2-day delivery.


Material lifespan data based on ASME B16.23 brass fitting standards and manufacturer warranty documentation. Installation procedures follow UPC (Uniform Plumbing Code) guidelines for lavatory drain connections. Cost-per-year calculations use median retail pricing from Amazon, Home Depot, and Lowe's as of April 2026. Professional plumber preference data sourced from trade forums including PlumbingZone and contractor surveys.