How to Replace a Delta Monitor 1300/1400 Cartridge (RP19804)
A Delta Monitor shower that keeps dripping from the tub spout or the showerhead after you shut it off usually needs one part: the cartridge behind the handle. Delta's own help page for a leaking 1300/1400 Series Monitor gives that answer: a new cartridge, part number RP19804. You change it from the shower side of the wall with basic hand tools.
The steps below follow Delta's own instruction sheets for this cartridge. They are listed at the end so you can read them yourself. Where a step comes from Delta, we say so.
First, make sure this is your cartridge
Delta lists the RP19804 as the single-function pressure balance cartridge for Monitor 1300 and 1400 Series tub and shower valves produced before March 2006, with a rotational limit stop built in. Single-function means the one handle sets the temperature only, not the volume. Later valves take a different cartridge, the RP46074, and Delta's cartridge sheet says plainly that the two are not interchangeable. The sheet tells them apart by the color of the cap, which is the end of the cartridge that faces you.
- White cap: Delta's sheet says a 1300/1400 Series cartridge, RP19804, is installed. This guide is for you.
- Grey cap: a MultiChoice 13/14 Series cartridge, Delta RP46074. Stop here and see our replacement for Delta RP46074 instead.
Check the age of the valve as well. Delta's parts page lists the RP19804 for valves produced before March 2006, and its title for the part reads 04/2006 and earlier. On a newer valve, do not go by the cap alone: Delta also sells a separate ceramic cartridge, RP74236, for some MultiChoice 13/14 models, and this part does not replace it.
Two more limits from Delta's parts page. The RP19804 will not work in Delta 600 Series shower valves, the kind you push up to turn on. And Delta's staff answer there says a valve that has the RP19804 can only use T13 or T14 trims without changing the rough-in valve, so a 17 Series trim will not fit it.
To be sure before you order, do steps 1 to 4 below and look at the cap. Then refit the bonnet nut, sleeve and handle, turn the water on and make sure cold water still flows first.
The color below the cap can differ. Delta's help page for a leaking 1300/1400 Series Monitor notes that a new RP19804 is blue and white, while the one in your wall may be white. Other makers sell this pattern under their own numbers. Our sister site Stems & Cartridges keeps a part record for the Delta RP19804 that lists Danco 10347 and Everbilt 48475 against it and sets its look-alikes side by side.
What you need
- A Phillips screwdriver for a knob handle, or a small hex key for the set screw on a lever handle.
- Channel-lock pliers and a towel, only if the bonnet nut will not turn by hand.
- A thermometer and a plastic cup, for checking the hottest water at the end.
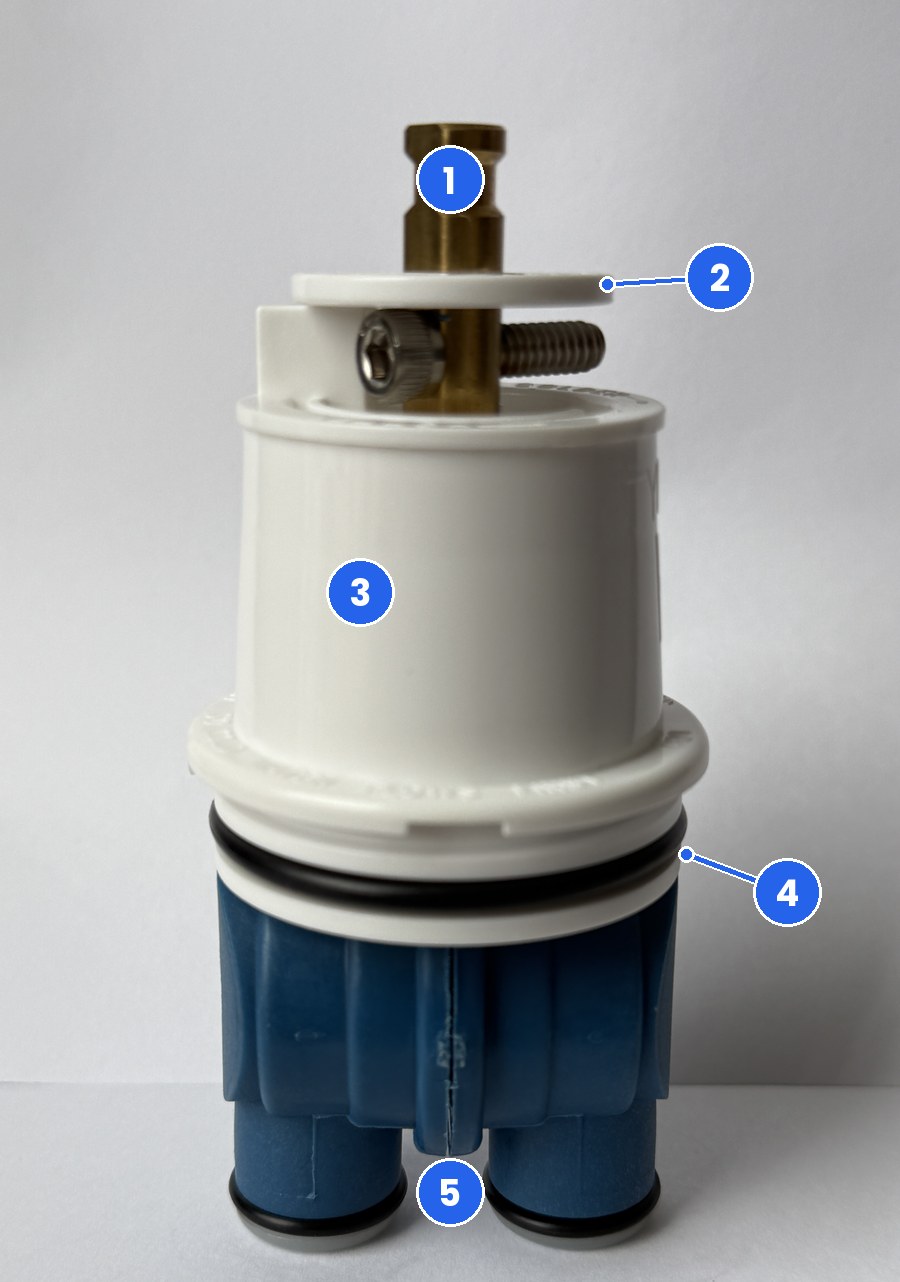
- The new cartridge, with its O-rings already fitted. The brass bonnet nut already in your valve is reused. Delta sells that nut separately as RP22734, and its own O-rings for this cartridge as RP14414 (the pair on the legs) and RP23357 (the larger one).
Delta's sheet puts it in capital letters: shut off the water supplies before you take the valve apart. Close the main shutoff for the house. Delta's parts list shows screwdriver stops built into the valve on some models only, so do not count on having them. Then turn the shower on to make sure nothing flows. Delta's sheet also says plumber installation is recommended. If any step here feels beyond you, or something in the wall moves that should not, stop and call a licensed plumber.
Replace the cartridge, step by step
Step 1: Shut off the water
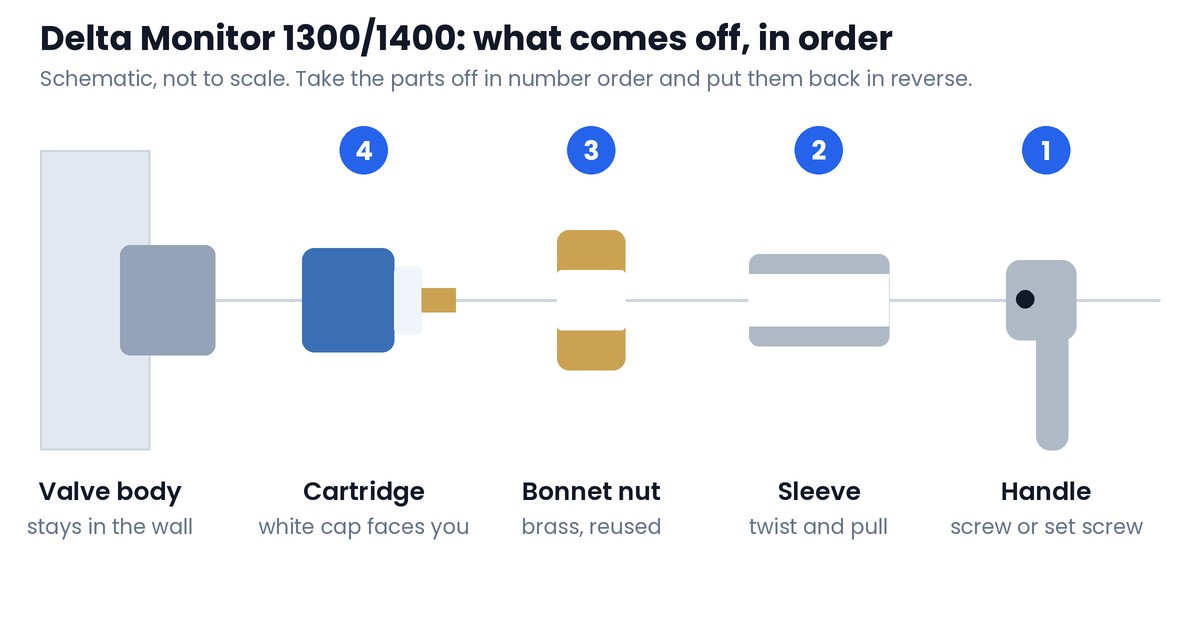
Close the supply as described above and turn the shower handle on to confirm the water is off.
Step 2: Take off the handle
Delta describes two kinds. A clear knob has a Phillips screw under the plastic cap in its center. A lever handle usually has a small set screw on its side; back it out with the hex key and pull the handle straight off. If the handle will not come off, do not pry against the wall or the trim. Stop and call a plumber.
Step 3: Slide off the sleeve
Twist the sleeve and pull it toward you. If there is an O-ring on the valve behind the sleeve, Delta's sheet says to slide it toward you only as far as the back of the bonnet, and not to pull it over the bonnet. The large round trim plate stays on the wall. Delta's cartridge steps do not call for removing it.
Step 4: Unscrew the bonnet nut
The bonnet nut is the large brass ring that holds the cartridge in. Delta says it should unscrew by hand, counterclockwise. Delta's sheet repeats its warning at this point: be sure the water supplies are shut off. If the nut is too tight, wrap a towel around it and use the channel-lock pliers, and watch that the whole valve body does not start to turn with it. If the valve body moves, or the nut will not come free, stop. That is a job for a licensed plumber.
With the bonnet nut off you can see the cap. This is the point where Delta's sheet has you check its color. White means a 1300/1400 Series cartridge, and you carry on. Grey means a MultiChoice valve, and you need the other cartridge.
Step 5: Pull the old cartridge
Before it comes out, look at how it sits. Delta's sheet says the raised stop on the cap belongs on the hot water side, which is the left in a normal installation. A quick phone photo now saves guessing later.
Delta's sheet is specific about how to remove it: do not pry the cartridge out with a screwdriver. Put the handle back on the brass stem, turn it counterclockwise and lift the cartridge out of the two notches in the sides of the valve body. Then pull it straight out, toward you.
Step 6: Seat the new cartridge
One caution from Delta's sheet before it goes in. Do not twist the cap and the lower housing of the new cartridge apart. If they do come apart, Delta says to twist them back together until they snap, and warns never to take the lower housing itself apart.
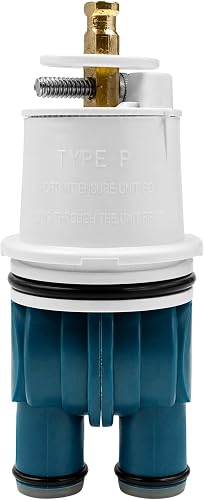
Seat the new cartridge the same way the old one sat. Delta's rule is the one from step 5: the raised stop on the cap, and the words Hot Side on Delta's own cartridge, go toward the hot water inlet. That is the left in a normal installation. Where two bathrooms share a wall and the hot supply comes in on the right, Delta's sheet says the hot side of the cartridge goes to the right. Press the cartridge in until its keys sit fully in the slots of the valve body.
Step 7: Refit the bonnet nut and the sleeve
Thread the bonnet nut back on by hand until it is snug. Then slide the sleeve back on over its O-ring, as Delta's sheet does at this point.
Step 8: Turn the water on and flush
Slip the handle onto the stem without its screw and turn it to the full on position, hot and cold mixed. Then turn the water supply back on, as Delta's sheets do, and watch for water coming from under the sleeve or behind the trim plate. Let it flush for one minute without moving the handle. Keep your hands out of the stream, because the limit stop is not set yet. If there is a showerhead, Delta's sheet says to remove it, send the water up to the shower and flush for another 30 seconds. Then turn the handle to off and put the showerhead back on.
Step 9: Check that cold water comes first
This is Delta's own safety check, printed in capitals on its sheet: after the repair, turn the valve on and make sure cold water flows first. The FourHome cartridge carries the same reminder, molded into its rim.
If hot water comes first, the cartridge is in backwards. Shut the water off, take the cartridge out, turn it half a turn and seat it again. Delta's support page on back-to-back installations confirms that flipping the cartridge reverses hot and cold.
Step 10: Set the limit stop
The rotational limit stop sets how far the handle can turn toward hot. A new cartridge may not sit where your old one did, so check the hottest water before anyone uses the shower.
Delta's method: run the water until the cold is as cold and the hot is as hot as they will get, put the handle on the stem and turn it counterclockwise until it stops. Then put a thermometer in a plastic cup and hold the cup in the stream. Compare the reading with the limit in your local plumbing code and in the instruction sheet for your valve. Delta's sheet 48027, linked under Sources, gives the limit it works to and says your local code may require less. Hot water can scald. Never leave the stop at its hottest position without checking, and if you do not know your limit, ask a licensed plumber before anyone uses the shower.
If the reading is above that limit, the stop must be moved cooler before anyone uses the shower. If the shower will not get warm enough, it can go hotter, one tooth at a time, with a fresh check after each move. On the FourHome cartridge the disc on the cap is marked SETTING ROTATIONAL LIMIT STOP, and the cap is marked HOTTER with an arrow.
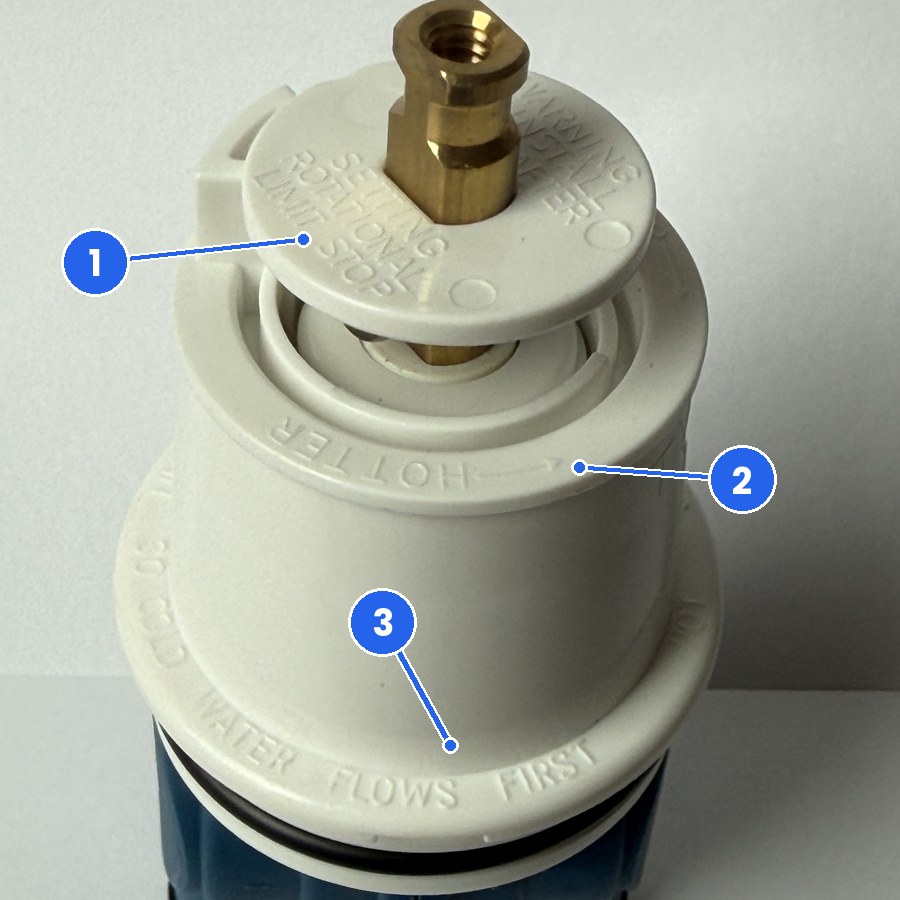
Delta's sheet describes the adjustment this way: pull the disc back far enough to lift the limit stop, re-engage its teeth in a new position, and push the disc back until it is fully seated. The sheet warns that failing to put the disc back after setting the stop could result in scald injury.
Which way is hotter? Delta's two sheets for this cartridge give opposite directions, so do not go by memory or by a video. Go by the HOTTER arrow on the cartridge in your hand. To make the water cooler, move the stop one tooth the opposite way from the arrow, push the disc back until it is fully seated, and check again. If the reading went up instead, move the stop the other way and check again.
Delta adds that the stop may need to be readjusted seasonally as the incoming water gets colder or warmer. Our guide to a shower that is not hot enough in winter covers that.
Step 11: Fit the handle for good
Put the handle on and tighten its screw. Delta's support page adds: do not overtighten. Run the handle through its full range once more and look for drips at the spout with the valve off.
If something is not right
- Hot and cold are reversed. The cartridge is in backwards. See step 9.
- The shower will not get hot enough, or gets too hot. That is the limit stop. See step 10.
- The flow is weak after the swap. Repeat the flush in step 8 with the showerhead off. Delta's low water pressure page also says to make sure the flow restrictor in the showerhead is not clogged. If the flow does not come back, call a plumber.
When to stop and call a plumber
- The valve body turns in the wall when you turn the bonnet nut.
- The handle or the bonnet nut will not come free without force.
- The water will not shut off completely before you start.
- You see water or staining coming from inside the wall.
Frequently asked questions
How do I know if my Delta shower takes the RP19804 or the RP46074?
Go by the age of the valve and the color of the cartridge cap. Delta lists the RP19804 for Monitor 1300 and 1400 Series tub and shower valves produced before March 2006. Take off the handle, the sleeve and the bonnet nut and look at the cartridge: Delta's cartridge sheet says a white cap is the 1300/1400 Series cartridge, RP19804, and a grey cap is the MultiChoice 13/14 Series cartridge, RP46074, and that the two are not interchangeable.
Will the RP19804 fit a Delta 600 Series or 17 Series shower?
No. Delta says the RP19804 will not work in 600 Series shower valves that push up to turn on. Delta also says a valve that has the RP19804 can only use T13 or T14 trims without changing the rough-in valve, so a 17 Series trim will not fit it. The RP46074 is a different cartridge and the two are not interchangeable.
Does a replacement cartridge come with the bonnet nut?
The FourHome replacement for Delta RP19804 is the cartridge only, with its O-rings fitted. The brass bonnet nut in your valve is reused. Delta sells that nut separately as RP22734.
Why are hot and cold reversed after I replaced the cartridge?
The cartridge is in backwards. Delta's instructions put the raised stop on the cap toward the hot water inlet, which is the left in a normal installation. Shut the water off, pull the cartridge, turn it half a turn, reseat it, and check that cold water flows first.
Why is my shower not as hot after a new cartridge?
The rotational limit stop on the cartridge sets how far the handle can turn toward hot, and on a new cartridge it may not sit where your old one did. Check the hottest water with a thermometer and move the stop one tooth at a time, staying within the limit in your local plumbing code. Delta's sheet says the stop may need to be readjusted seasonally.
Is a Delta shower cartridge covered by warranty?
Delta warrants the parts of faucets bought from authorized Delta sellers to the original consumer purchaser for as long as that person owns the home where the faucet was first installed. Delta requires proof of purchase for a warranty claim unless the faucet was registered, and the warranty is not transferable. If that is you, call Delta at 1-800-345-DELTA (3358) before you buy a part.
Sources
The Delta steps above come from these documents. We opened each one on October 6, 2026.
- Delta Faucet, RP48025 1300/1400 and 13/14 Cartridges Installation Instructions (sheet 48027 Rev. B): cap colors, removal, orientation, flush, cold water first, limit stop adjustment.
- Delta Faucet, RP19804 cartridge maintenance and installation sheet (34459 Rev. A): the raised stop on the hot side, the handle position for the flush, and the earlier limit stop design.
- Delta Faucet, MultiChoice 13/14 Series owner's manual (107528 Rev. I): cartridge summary reference sheet, for the MultiChoice cartridges RP46074 and RP74236; Allen wrench for a handle set screw; hand tightening the bonnet nut.
- Delta Faucet, parts diagram for Models 1300 and 1400: bonnet RP22734, O-rings RP14414, set screws, screwdriver stops.
- Delta Faucet support pages: back-to-back installations (handle types, bonnet nut, reversed hot and cold), the rotational limit stop, a leaking 1300/1400 Series Monitor, hot or cold only (sleeve removal) and low water pressure.
- Delta Faucet part page and staff answers: RP19804 (fit, limit stop, O-ring numbers RP14414 and RP23357, 600 Series and trim answers).
- Delta Faucet, limited warranty.
Replacement cartridges and stems for Delta, Moen, Kohler, Pfister and more, shipped from Amazon fulfillment centers with Prime delivery.
See the full FourHome assortment on AmazonFourHome is an independent brand and is not affiliated with Delta Faucet Company. Brand names and part numbers are used only to identify compatibility. Follow the instructions that came with your valve, keep the hottest water at or below the limit your local plumbing code sets, and call a licensed plumber if you are not sure of a step.
FourHome is not affiliated with or endorsed by any faucet manufacturer. Brand names and part numbers are used only to identify compatibility.