Kitchen Faucet Dripping? Fix It Before the Holiday Cooking Starts

The kitchen sink works harder in November and December than in any other month. Turkeys get rinsed, pans get soaked, and every guest fills a glass. A faucet that drips from the spout after you push the handle off is annoying in March. In the week before Thanksgiving it is the thing everyone standing at the sink notices.
The good news: a drip with the handle off usually does not mean a new faucet. It means one worn part inside the faucet, and the manufacturers' own repair pages walk through the swap. We did the reading so you can do the fix in one evening, with the water back on before dinner.
This guide covers the two faucets we get asked about most: a single-handle Moen kitchen faucet that takes the 1200 or 1225 cartridge, and a two-handle Delta kitchen faucet that takes a stem with a seat and spring underneath. The ideas carry to other brands, and the end of the post says where to look if yours is neither.
First, find out where the water is coming from
Family Handyman's first instruction is to look closely before you take anything apart, because a drip from the end of the spout and a leak around the base of the spout are two different repairs.
- Drip from the end of the spout with the handle off. This is the one this guide fixes. On a single-handle faucet it means the cartridge. On a two-handle faucet it means the seats and springs, or the stem.
- Water at the base of the spout where it swivels. Family Handyman puts that on the worn O-rings under the spout, not the cartridge. This Old House says the same of a leak at the base of the handle. Either way it is a different part.
- Water under the sink. Look at the supply lines and their connections before the faucet valve.
Still not sure which faucet you have? One lever that lifts and swings is a single-handle faucet, and the part inside is a cartridge. Two separate handles for hot and cold means a stem on each side.
What you need
- A hex key set and a Phillips screwdriver for the handle. The size varies by model.
- Pliers. Moen's 1225 page lists pliers as the only tool for the cartridge itself. Adjustable pliers or a wrench for a two-handle bonnet nut.
- A flathead screwdriver for the Moen retainer clip, which is how Moen's clip page starts.
- A pencil, for lifting a Delta seat and spring out of the body. Delta suggests a pencil or a hex key.
- A rag or a stopper for the drain, a towel, and white vinegar if the faucet has scale.
- The new part. Moen cartridge: the clip already in your faucet is reused. Delta two-handle: the stem kit, with seat and spring.
- A cartridge puller if your Moen cartridge has been in a long time. More on that at step 5.
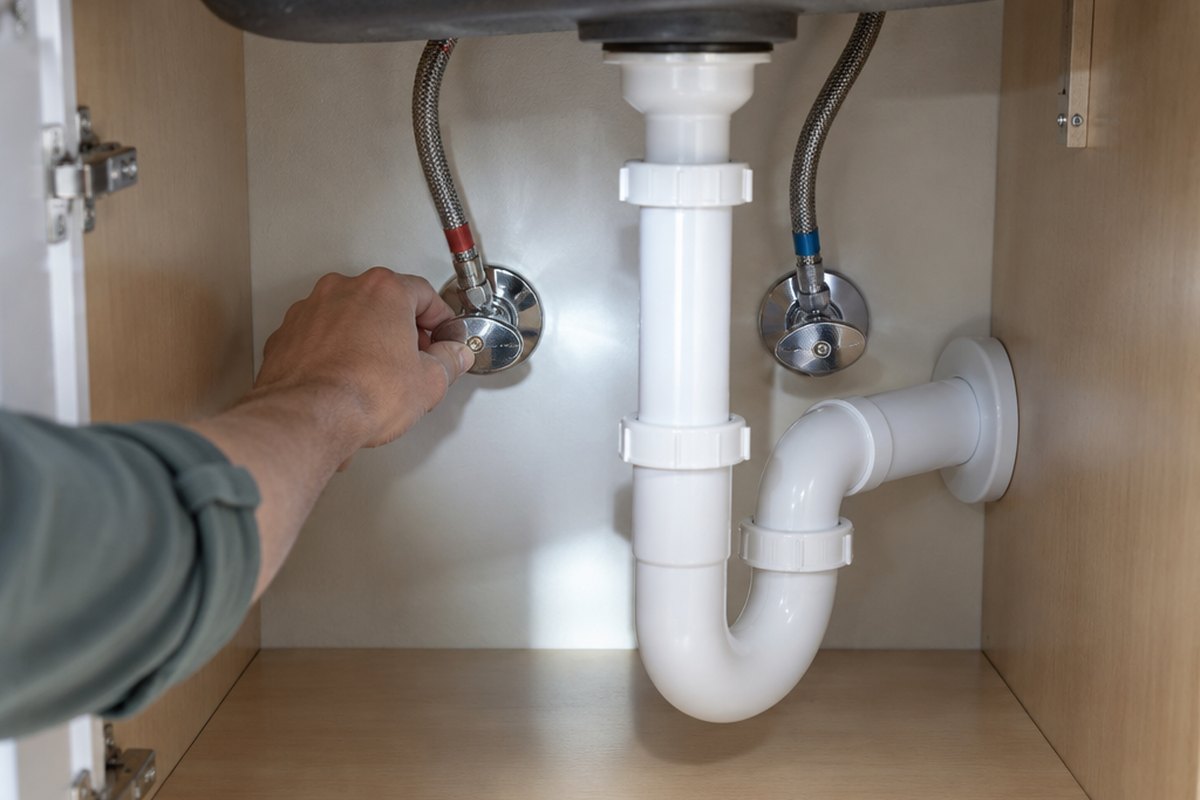
Moen says it plainly: any faucet repair requires the water supply to be shut off, and failing to do so could result in flooding or injury. The shutoffs are usually the two small valves under the sink. Turn them clockwise until they stop, then open the faucet handle. Water should slow to a trickle and stop. This Old House adds the test that matters: if water still comes on, the valves are not holding and you need to close the next valve down the line or the main. If a valve under the sink will not turn, do not force it. A shutoff that breaks is a bigger problem than a drip.
Two more habits from the repair guides before the first screw comes out. Cover the drain: Delta, Family Handyman and This Old House all say it, because small parts go down an open drain. And take a phone photo at each stage. Family Handyman recommends recording the order and orientation of the parts as they come off, and Home Depot says the same.
Single-handle Moen: replace the 1200 or 1225 cartridge
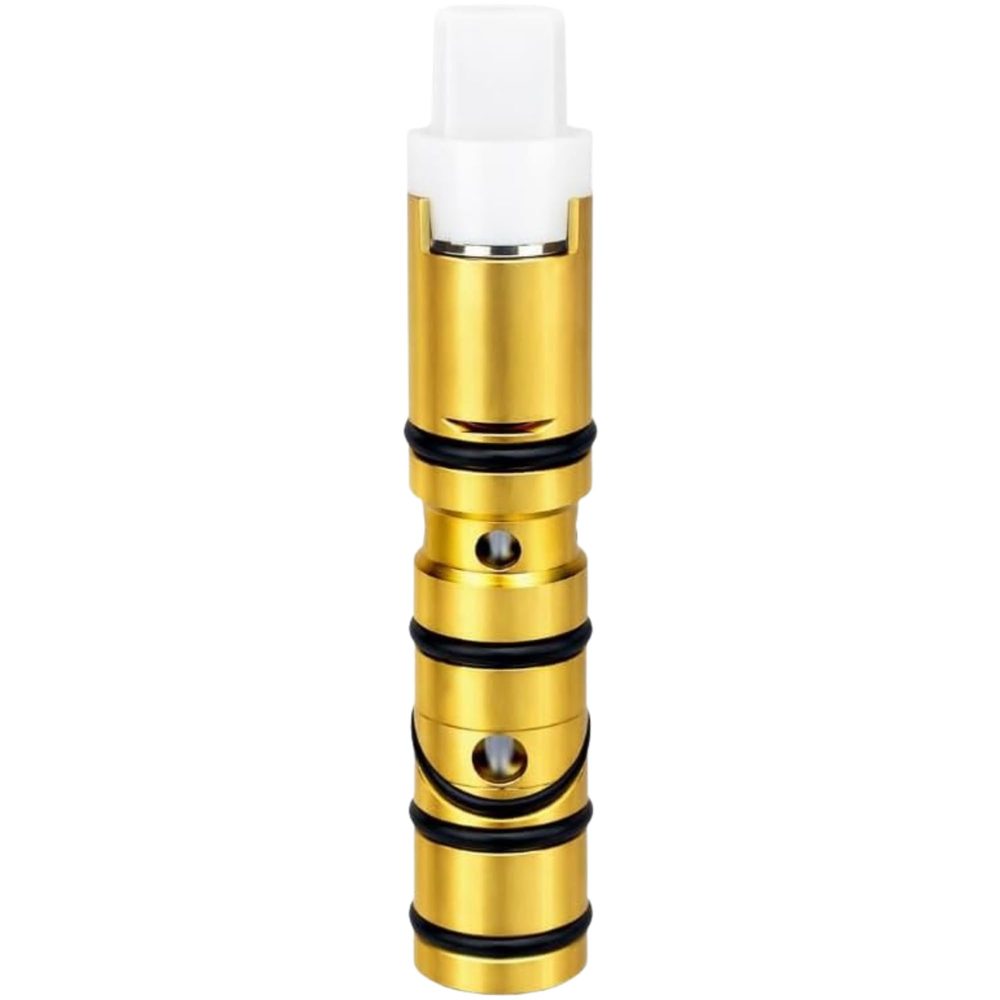
Moen's own repair page describes the 1225 as the cartridge built in directly below the handle that controls both volume and temperature, commonly used in its single-handle faucets made before 2009. If the handle pulls out for flow and turns for temperature, which is how our own fit check describes a 1200 or 1225 valve, this is the section for you. The steps below follow Moen's page, with the handle removal from Family Handyman's Moen walkthrough, since Moen keeps handle removal on separate per-style pages.

Step 1: Shut off the water and open the faucet
As above. Leave the faucet open in the middle position so the lines drain, then plug the drain.
Step 2: Take off the handle
Family Handyman's Moen sequence: pry off the handle cap, turn the screw under it counterclockwise and lift the handle off. If your handle has a dome and a metal adapter under it, as Family Handyman's example does, unscrew the dome, lift off the adapter, then lift off the plastic pivot stop.
Step 3: Remove the retainer nut, if there is one
Some Moen kitchen faucets have a large retainer nut over the cartridge. Family Handyman turns it counterclockwise with large slip-joint pliers. Others go straight to the clip.
Step 4: Pull the clip
Moen's instructions: slide the copper clip out of the valve body with a flathead screwdriver. The clip sits in the gaps on the valve body, and Moen notes it could have been installed from the front or the back. Family Handyman pries it up with a screwdriver tip, then grabs it with pliers and pulls it the rest of the way out so it does not get lost. Keep this clip. The FourHome brass replacement does not include one, and Moen's rule is that if the clip cannot be installed or appears damaged, the water cannot be turned back on until the clip is replaced.
Step 5: Loosen and pull the old cartridge
Moen's page has you use the plastic twisting tool from the cartridge kit to rotate the cartridge a quarter turn in either direction to loosen it, then remove the tool, raise the stem until it stops, grab the stem with pliers and pull the cartridge out. In Moen's words, this may require some effort. Family Handyman's warning is the same: do not be surprised if the cartridge seems stuck, and really stubborn ones need a cartridge-pulling tool.
Moen's puller instructions, for its 104421 tool, in short: pull the clip and pull the stem to the full open position, back the knurled screw out of the tool and leave a thread of the hex nut showing, set the tool on the cartridge with its tabs between the cartridge tabs, screw the knurled screw down into the stem until it stops, screw the hex nut down until it stops on the valve, then twist the tee handle. If it still will not come, hold the handle and tighten the hex nut with a wrench. The FourHome cartridge puller for Moen 1200 and 1225 cartridges is built on the same screw-and-nut design. If the stem comes out and leaves the brass shell behind in the valve, Moen has a separate page for that (it involves a tap wrench), and that is a reasonable point to call a plumber.
Step 6: Clean and flush the valve body
Moen recommends the valve body be cleaned and flushed before a new cartridge goes in, because mineral build-up and loose debris could damage the new cartridge or obstruct the flow of water. Its method: gently scrub the inside walls with a nylon bristle brush (a toothbrush works), then, with a second person, hold a large bowl upside down over the open valve body and turn one shutoff on slightly so a little water flushes through and back into the sink, then close it and repeat for the other side, as Moen does. Moen warns the water may come out with considerable force. Then dry the bottom of the valve body with a rolled paper towel, because Moen says if the water is not eliminated, the cartridge will not fit all the way back in. Family Handyman soaks mineral deposits in vinegar.
Step 7: Seat the new cartridge
Moen's instruction is to slide the new cartridge into the brass valve body, aligning the two plastic tabs on the cartridge with the cutouts on the valve body, and to push it in completely so the tabs are flush with the valve body and centered on the cutouts. Family Handyman pulls the stem up before inserting the cartridge and notes you may have to twist it slightly to line it up for the clip. Home Depot's cartridge guide puts a thin coat of plumber's grease on the part of the cartridge going in, and names silicone grease for the O-ring.
Step 8: Put the clip back
Moen: gently slide the clip back into the valve body on top of the cartridge. If you feel any resistance, do not force it; the cartridge is not aligned yet. Push the cartridge in the rest of the way with the twisting tool and try again. This Old House puts it as fitting the retainer clip snugly into its slot before the bonnet and handle go back on.
Step 9: Point the notch forward
This is the step that decides hot and cold. Moen's words: rotate the stem of the cartridge so the small notch is facing forward, because the notch on the stem determines the hot and cold location. Moen's rule for kitchen faucets: if the hot supply line under the sink is on the left and the cold on the right, the notch faces the front of the faucet. If the supplies are the other way around, the notch faces the back.

Step 10: Reassemble, turn the water on slowly and test
Retainer nut, dome, adapter and handle go back in the reverse order of your photos. Then follow Family Handyman: open the faucet to the middle position and gradually open the shutoff valves, leaving the faucet open until the water flows freely and the air is out of the pipes. Push the handle off and watch the spout for a full minute.
If hot and cold are reversed, Moen says to rotate the stem 180 degrees. On the kitchen faucet it is not necessary to remove the cartridge: take the handle back off and turn the stem half a turn. If the flow is weak after the swap, Moen's aerator page says debris and mineral deposits in the aerator restrict pressure, so unscrew the aerator and clean it.
Two-handle Delta: seats and springs first, then the stem
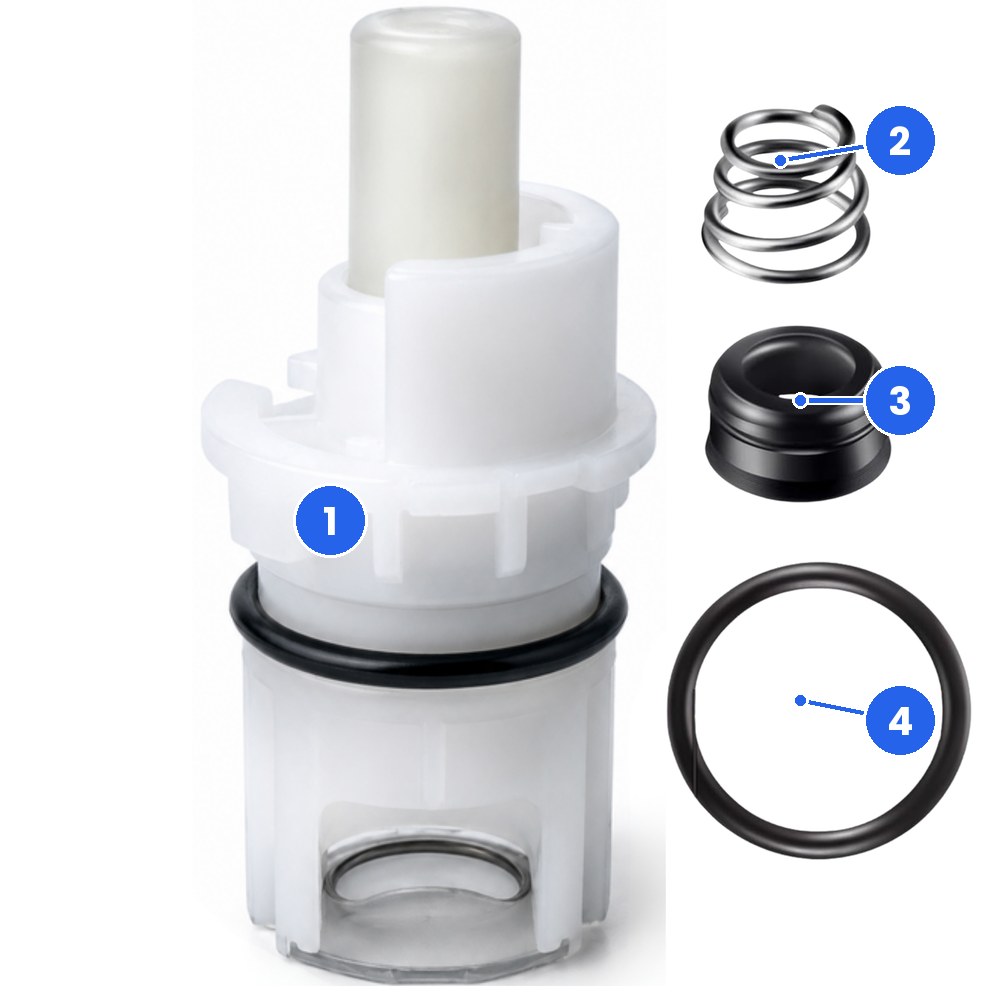
Delta's answer to a two-handle kitchen faucet dripping from the spout is specific. With normal wear the seats and springs become worn, which may result in a leak from the spout, and the first fix is to replace them. If the drip continues after new seats and springs, Delta says to replace both stem assemblies. The FourHome replacement for Delta RP25513 does both at once: the stem comes with its seat, spring and quarter-turn stop, so one kit rebuilds one side.
Delta's page starts on the hot side and says to repeat on the cold side if the drip persists. Family Handyman adds that leaks usually develop on the hot side, and advises replacing the seats on both sides while you are in there.
Step 1: Shut off the water and cover the drain
Both are the first two lines on Delta's page. Open both handles afterward to make sure the water is off.
Step 2: Take off the handle
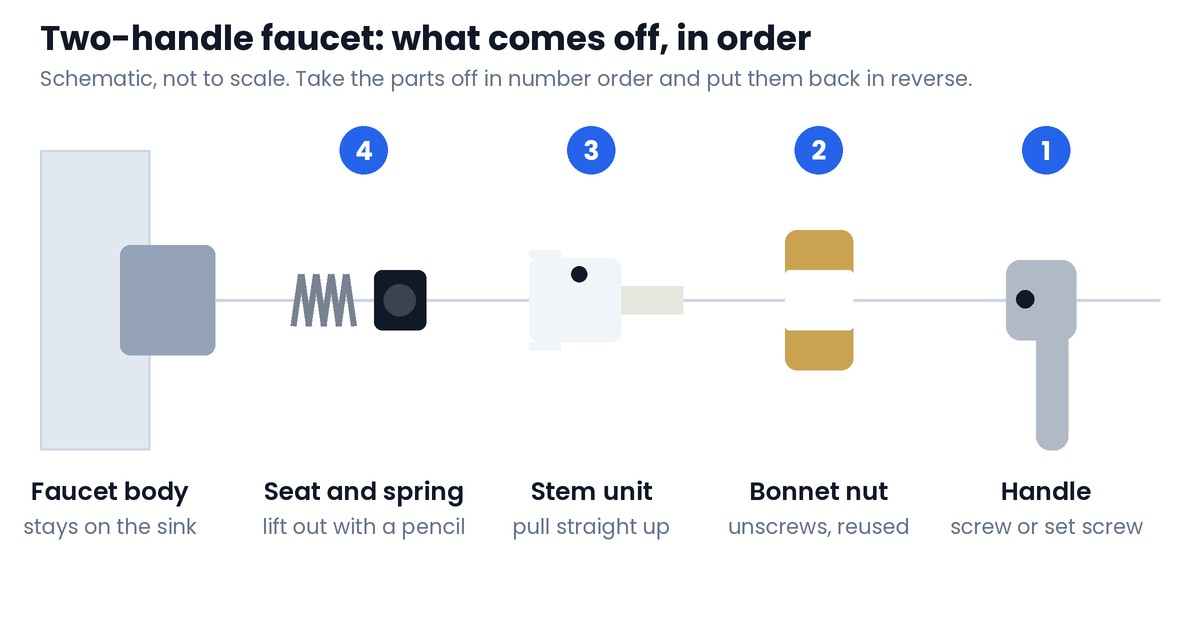
Delta: lever handles have a set screw, so loosen it with a hex wrench and lift the handle off. Knob handles have a button on top; pry it off, remove the screw under it and lift the handle. This Old House notes the handle screw is usually brass and strips easily, so seat the screwdriver fully, push down and turn counterclockwise.
Step 3: Unscrew the bonnet nut
Delta's step: unscrew the bonnet nut, with an adjustable wrench if it is tight. Set it aside. You will reuse it.
Step 4: Pull the stem straight up
Delta's words: pull the stem straight up and out. Look at it before it goes in the bag. The tabs on the stem sit in slots in the body, and Delta's answer on its stem page ties the position of the raised portion, or stop, and the flat of the stem to which way the handle turns. Your phone photo of this moment answers the orientation question later.
Step 5: Lift out the old seat and spring
Down in the bottom of the body is a small rubber seat sitting on a spring. Delta says you can lift them out with a pencil or a hex wrench. Then wipe the inside of the body, including where the seat and spring sit, with a soft cloth. If there is scale, a vinegar-dampened cloth takes it off.
Step 6: Install the new spring and seat
Delta is specific about which way they go: the spring goes into the valve bigger end first, and the seat sits over the smaller end of the spring. Delta's tip for placing them: set the seat and spring on the tip of a pencil or a hex key, lower them into the hole, then press them home with a finger.
Step 7: Seat the new stem the right way round
Delta prints this one in capitals: the stem must be replaced properly. Slip the stem into the body with its tabs in the slots. For knob handles, Delta says the stop on each stem points toward the spout. For lever handles, the stop points to the right, and Delta adds that you may also need to reinstall the quarter-turn stops so the handles cannot turn more than 90 degrees. Delta's answer on its stem page gives the detail for a lever faucet with hot on the left: the fixed stop faces right on both sides, the removable quarter-turn stop sits on the front of the hot stem and on the back of the cold stem, and the flat of the brass stem faces left on the hot side and right on the cold side.

Some Delta two-handle faucets take the replacement for Delta RP1740 instead, which has no quarter-turn stop; Delta's page names the RP1740 for those faucets and the RP25513 for faucets requiring the stop. If your stems are fine and only the rubber has gone, the replacement for Delta RP4993 seats and springs is the same seat and spring Delta names on its repair page, in a pack that does many faucets.
Step 8: Bonnet nut on, handle on, test
Delta: screw the bonnet nut on and hand tighten, then replace the handle and tighten its screw. Open the shutoffs slowly with the faucet open, let the air out, then close both handles and watch the spout. If the handle turns the wrong way, Delta's note is to rotate the stem 180 degrees and check again. If the drip persists, Delta says to repeat the steps on the cold valve.
If your faucet is neither of these
| Your faucet | Where the drip comes from | Where to go next |
|---|---|---|
| Single-handle Glacier Bay or AquaSource bathroom faucet | A 35 mm ceramic disc cartridge under the handle | Our Glacier Bay 35 mm cartridge guide, step by step |
| Delta single-handle ball faucet | The seats and springs under the ball | Family Handyman: if it drips from the end of the spout, replace the seats and springs. Delta's RP4993 page says those seats and springs are found in some kitchen, lavatory and shower faucets. |
| Two-handle Delta or Glacier Bay lavatory faucet with ceramic stems | A ceramic disc stem on each side | Pull one stem and match it on our stem and cartridge finder |
| Moen single-handle Posi-Temp shower | A different cartridge, the 1222, which Moen's page describes as the cartridge for a single-handle Posi-Temp shower valve | Our Moen 1222 replacement guide |
| Any brand, no label anywhere | Depends on the part | Pull the part and compare it with the photos on our sister site Stems & Cartridges, or take it to the store. Family Handyman says the safest bet is to take the worn part with you. |
When to stop and call a plumber
- A shutoff under the sink will not close, or leaks when you turn it.
- The cartridge shell stays behind in a Moen valve after the stem comes out, and you do not own a tap wrench.
- The faucet body is cracked, or the bonnet nut or valve body turns with the part.
- The drip continues after new seats, springs and stems. Delta's page ends its steps there, and so do we.
Both Moen and Delta warrant their faucets to the original consumer purchaser for as long as that person owns the home, and both say they will provide the parts free of charge, with proof of purchase and other terms that apply. Moen's number is 1-800-BUY-MOEN and Delta's is 1-800-345-3358. If you bought the faucet and kept the receipt, that call is free. If the faucet came with the house, a replacement part is the faster route to a quiet sink.
One more reason to do it this month rather than next: the EPA's WaterSense program lists dripping faucets among the common types of leaks found in the home and says fixing the easily corrected ones saves on the water bill.
Frequently asked questions
Why does my kitchen faucet drip when the handle is off?
The handle is not what stops the water. A cartridge or a stem does that, and under a two-handle stem a small rubber seat on a spring does. When those parts wear, water seeps past them and out the spout. Replacing the worn part stops the drip, and replacing the whole faucet is rarely needed.
How do I tell whether my Moen faucet takes the 1200 or 1225 cartridge?
Moen says the 1225 is commonly used in its single-handle faucets made before 2009, and FourHome's replacement fits valve bodies made for the 1200, 1225, 1225B and 1200B. Our fit check: pull the handle and look for a long cartridge body with black O-rings, held in by a U-shaped clip, that pulls out for flow and turns for temperature. A round ceramic disc cartridge is a different part, and so is a shower handle that only turns, which points to the 1222.
Hot and cold are reversed after I put in the new cartridge. What happened?
The stem is turned the wrong way. Moen says the notch on the stem sets the hot and cold location, and that if they are reversed you rotate the stem 180 degrees. You do not need to pull the cartridge out. On a Delta two-handle stem, Delta's answer is the same: rotate the stem 180 degrees and check the handle rotation.
Do I need the seats and springs as well as the Delta stem?
Delta's first fix for a two-handle spout drip is new seats and springs, and its own answer on the stem page is that the stem works together with the seats and springs, so it is a good idea to change them when changing the stem. The FourHome replacement for Delta RP25513 ships with a seat, a spring and the quarter-turn stop, so one kit rebuilds one side.
Is this covered by warranty instead?
Possibly. Moen and Delta both warrant their faucets to the original consumer purchaser for as long as that person owns the home, and both say they will supply the parts free of charge, with proof of purchase. If that is you, call Moen at 1-800-BUY-MOEN or Delta at 1-800-345-3358 before you buy a part. If the faucet came with the house, a replacement part is the faster route.
Sources
Every step above comes from these pages. We opened each one on October 5, 2026.
- Moen Solutions, 1225 Cartridge: Kitchen Faucet: what the 1225 is, clip removal, the twisting tool, pulling the cartridge, tab alignment, the notch, reversed hot and cold.
- Moen Solutions, How to Reverse Hot and Cold for a 1225 Cartridge in a Kitchen Faucet: the 180 degree rule and which way the notch faces.
- Moen Solutions, Installing a Cartridge Clip (1200 and 1225 Cartridge), Using a 104421 Cartridge Removal Tool, Removing a Stuck 1200 or 1225 Cartridge and Valve Body Cleaning and Flushing.
- Moen Solutions, How to Turn Off the Water Supply to the Faucet and Faucet Aerator Cleaning.
- Moen, Lifetime Limited Warranty (as hosted by Lowe's).
- Delta Faucet, What do I do about water dripping from the spout of my two-handle kitchen faucet?: seats and springs first, every step, stem orientation, then the stem assemblies.
- Delta Faucet part pages and staff answers: RP25513, RP1740 and RP4993.
- Delta Faucet, warranty.
- Family Handyman, How to Fix a Leaky Faucet (the Moen walkthrough) and Quickly Replace a Leaky Faucet Cartridge.
- This Old House, How to Repair a Dripping Single-Handled Faucet and How to Repair a Leaky Kitchen Faucet.
- The Home Depot, How to Replace a Cartridge in a Faucet.
- EPA WaterSense, Fix a Leak Week.
Replacement cartridges, stems, seats and springs for Moen, Delta, Kohler, Pfister, Glacier Bay and more, shipped from Amazon fulfillment centers with Prime delivery. Order this week and the sink is quiet before the first guest arrives.
See the full FourHome assortment on AmazonFourHome is an independent brand and is not affiliated with Moen Incorporated, Delta Faucet Company, Glacier Bay or The Home Depot. Brand names and part numbers are used only to identify compatibility. Follow the instructions that came with your faucet, and call a licensed plumber if a shutoff will not close or you are not sure of a step.
FourHome is not affiliated with or endorsed by any faucet manufacturer. Brand names and part numbers are used only to identify compatibility.